Tuesday, July 28, 2009

A Culinary Trip to Ireland: Ballymaloe Farm


The Ballymaloe Cookery School is in the middle of an organic farm, including an herb garden, greenhouses, free range chickens, dairy and beef cattle, among many other things. Darina Allen, the head of the school, is a big proponent of the "Slow Food" movement (she is the Councillor for Ireland in that organization).


Given that background, it's no surprise that Darina supports people growing and raising their own food, including chickens. (She very generously gives people like me who live in high-rise apartment buildings with no balconies dispensation to buy instead.) One of the highlights of the 3-day course I took was jointing a whole chicken, which yields enough food for more than a week for someone like me.


As she pointed out--multiple times,in fact--a single whole chicken will yield 2 each of breasts, wings, thighs, drumsticks, as well as chicken skin (good for baking until crispy), wingtips, neck, and bones suitable for stock, and liver for pate (which I don't personally care for, but I'm sure other people like). A whole organic chicken can cost about $22-$26 (about $5.49 a pound), compared to $4-$5 (at about .99 cents a pound, sometimes it's as little as .49 cents) for a whole standard chicken. Whole chickens also tend to keep better longer, at least before you portion it out. Now that I've actually jointed a whole chicken, I can't see buying chicken breasts unless I'm pressed for time.


One thing I'm dead envious of at Ballymaloe is all the lettuce, vegetable, and herb garden space they've got. I can't help but think it would be much easier to eat better and more varied salads on a regular basis if I had access to this kind of facility in Boston. (Well, as long as I am wishing, I'd like a staff of a prep cooks like they had at Ballymaloe as well. I did try to grow some hydroponic herbs in my apartment and all I got was mice.) The salads they served with lunch at Ballymaloe were excellent, full of enough different types of lettuce and herbs for a variety of texture and flavor. I'm sure it helped that we were there in mid-July.


Ballymaloe also grows nearly a dozen different varieties of heirloom tomatoes, which I can tell you are delicious. I have some pictures of the resulting tomato salad Darina's team prepared, which I'll put up in a future post. It is prepared with all of the tomatoes dressed and served in a single layer, to avoid having to toss the tomatoes and break them up.


Ballymaloe grows enough onions, shallots, and garlic for their own use as well as distribution to some local programs. They hang them from the rafters, tops still attached, to dry in small bunches of no more than 4, to avoid bruising and rotting. The gardener--Darina's husband--contended that letting the vegetables and herbs dry with the leaves still on helps to retain nutrients and flavor in the bulb part of the plant. I won't argue--the results look and taste gorgeous.


Coming up next: more about the cooking demonstrations and lessons at Ballymaloe Cookery School (and maybe a recipe or two...)



A Culinary Trip to Ireland: Prequel

I'll soon be posting about my trip to the Ballymaloe Cookery School (in Shanagarry, Co. Cork, Ireland), as well as some of the dishes eaten at restaurants on the way.

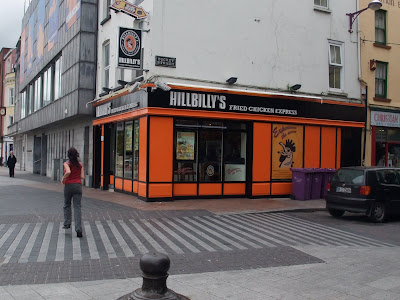
Just as a little preview, though, here is a picture of a fast food restaurant in Cork city...
You could never get away with this in the States!

Thursday, July 2, 2009

Oven Fries

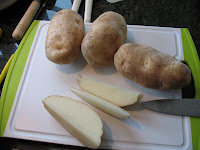
Normally in late June and early July, I would be trying to make my favorite grilled "puzzle" potatoes. (Take a potato, slice it crosswise into verrry thin pieces, keep the potato slices assembled in their original order, add a pat of butter, salt, and pepper, wrap in aluminum foil, and grill.) However, so far summer has very much failed to deliver in the weather-appropriate-to-grilling department, so, I tried a Cook's Illustrated alternative--oven fries. They came out great! These pictures really don't do them justice.


Ingredients
3 russet potatoes (about 8 oz), sliced lengthwise into 10-12 spears each
5 tablespoons olive oil
salt and pepper

Hardware
18 by 12 inch heavy-gauge baking sheet, preferably nonstick--or, you can use my favorite easy clean-up trick--aluminum foil! (If you use a smaller sheet, you may need to do two batches.)

Directions
1. Adjust oven rack to lowest position; heat oven to 475 degrees. Place potatoes in large bowl and cover with hot tap water; soak 10 minutes. Meanwhile, coat 18 by 12-inch heavy-duty rimmed baking sheet with 4 tablespoons oil and sprinkle evenly with 3/4 teaspoon salt and 1/4 teaspoon pepper; set aside.

2. Drain potatoes. Spread potatoes out on triple layer of paper towels and thoroughly pat dry with additional paper towels. Rinse and wipe out now-empty bowl; return potatoes to bowl and toss with remaining 1 tablespoon oil. Arrange potatoes in single layer on prepared baking sheet; cover tightly with foil and bake 5 minutes. Remove foil and continue to bake until bottoms of potatoes are spotty golden brown, 15 to 20 minutes, rotating baking sheet after 10 minutes. Using metal spatula and tongs, scrape to loosen potatoes from pan, then flip each wedge, keeping potatoes in single layer. Continue baking until fries are golden and crisp, 5 to 15 minutes longer, rotating pan as needed if fries are browning unevenly.

3. Transfer fries to second baking sheet lined with paper towels to drain. Season with additional salt and pepper to taste and serve.

Tuesday, June 16, 2009

Pointless Kitchen Paraphernalia, Episode 1

In my browsing around the internet, I occasionally run into some cooking- and kitchen-related objects whose utility I question. In the first of what may be an ongoing series, here is some Pointless Kitchen Paraphernalia.

When I first came across this example of PKP, I thought, you've got to be kidding me. Perhaps it's because I don't try to roast a lot of jalapenos, but I don't get spending $20 (+ $6.50 shipping) for a stuffed jalapeno roaster. What else could you conceivably use this for to justify that kind of money, when I figure you could likely make something perfectly workable using aluminum foil, that you then could just throw away, thus avoiding the arduous process of trying to scrub burnt cheese off of 18 individual 1/2-inch-wide holes?

Maybe I'm wrong, the reviews on Williams Sonoma have it at 4.5
out of 5. I suspect these reviews are all from dedicated jalapeno-roasters.

Entry number 2 in today's PKP sweepstakes is an asparagus
peeler, also from Williams Sonoma. (I don't mean to beat up on Williams Sonoma, although it does seem to be a rich source of PKP.)
My first thought was, why on earth would one need an asparagus peeler? After some research, it appears that many chefs--especially French ones, apparently--recommend peeling the bottoms of asparagus to improve the texture and let it cook more evenly. All right, fair enough.

But let's look at this particular example. It offers two services--the snipping off of the woody, fibrous ends of asparagus with its "integral nylon blade" and the removal of the asparagus peel with its metal peeling blade. If you had a choice, would you prefer to cut off the ends of asparagus a foot above the counter, using an awkwardly shaped pair of nylon scissors with a sharp metal blade in one handle? Or would you rather rest the spear on the counter, and cut it with something you already own, like, oh, a knife? And, (bonus!) with a knife, you can cut several asparagus spears at the same time! Now, let's address the second service this gadget provides. If I'm not mistaken, the metal peeling blade appears to be identical to that of the vegetable peeler currently residing in every kitchen drawer in America. The only difference here is that, since this metal peeler is attached to the second lever for the scissor blade, it makes it more difficult to use to peel, say, a potato or a radish.

So, why not use the peeler and knife you already own instead of this $9.95 (+$5.50 shipping) green nylon beauty? Hmm. Good question.

Thursday, April 23, 2009

Cheaper to buy or to make?


Jennifer Reese writes an article for Slate that documents whether it is cheaper to buy or to make certain pantry staples like bagels, cream cheese, and jam. (Plus a shout-out to Alton Brown...can't go wrong!)

Thursday, April 2, 2009

Brown Sugar Cookies

These are also known as the Coma Cookies...diabetics need not apply! The recipe comes from the March 2007 issue of Cook's Illustrated, and it's always been a big hit for gifts, bake sales, and just a little dessert now and again. It's also another great pantry standby because all the ingredients are things I commonly keep on hand--plus, they're really easy and fun to make!

The brown sugar combines with the browned butter for a rich, caramel-like flavor. I tend to go for a chewier cookie, so I add an extra few tablespoons of melted (not browned, since some moisture is lost in browning) butter.

Ingredients:
  • 14 tbs unsalted butter (1 3/4 sticks)(I add the remainder of the second stick of butter for a chewier cookie)
  • 1/4 cup granulated white sugar (about 1 3/4 ounces)
  • 2 cups packed dark brown sugar (14 ounces)
  • 2 cups unbleached all-purpose flour plus 2 tablespoons (about 10 1/2 ounces)
  • 1/2 tsp baking soda
  • 1/4 tsp baking powder
  • 1/2 tsp table salt
  • 1 large egg
  • 1 large egg yolk
  • 1 tbs vanilla extract

Hardware
  • stainless steel saucepan or skillet
  • 2 cookie sheets
  • parchment paper (although aluminum foil does in a pinch)
  • heatproof bowl
  • medium to large mixing bowl
  • spatula
  • shallow dish or pie pan

Instructions
  1. Heat 10 tablespoons butter in 10-inch skillet over medium-high heat until melted, about 2 minutes. Continue to cook, swirling pan constantly until butter is dark golden brown and has nutty aroma, 1 to 3 minutes. Remove skillet from heat and transfer browned butter to large heatproof bowl. Stir remaining 4 (6 for chewy cookies) tablespoons butter into hot butter to melt; set aside for 15 minutes.
  2. Meanwhile, adjust oven rack to middle position and heat oven to 350 degrees. Line 2 large (18 by 12-inch) baking sheets with parchment paper. In shallow baking dish or pie plate, mix granulated sugar and 1/4 cup packed brown sugar, rubbing between fingers, until well combined; set aside. Whisk flour, baking soda, and baking powder together in medium bowl; set aside.
  3. Add remaining 1 3/4 cups brown sugar and salt to bowl with cooled butter; mix until no sugar lumps remain, about 30 seconds. Scrape down sides of bowl with rubber spatula; add egg, yolk, and vanilla and mix until fully incorporated, about 30 seconds. Scrape down bowl. Add flour mixture and mix until just combined, about 1 minute. Give dough final stir with rubber spatula to ensure that no flour pockets remain and ingredients are evenly distributed.
  4. Divide dough into 24 portions, each about 2 tablespoons, rolling between hands into balls about 1 1/2 inches in diameter. Working in batches, toss balls in reserved sugar mixture to coat and set on prepared baking sheet, spacing them about 2 inches apart, 12 dough balls per sheet. (Smaller baking sheets can be used, but it will take 3 batches.)
  5. Bake one sheet at a time until cookies are browned and still puffy and edges have begun to set but centers are still soft (cookies will look raw between cracks and seem underdone; see photo below), 12 to 14 minutes, rotating baking sheet halfway through baking. Do not overbake.
  6. Cool cookies on baking sheet 5 minutes; using wide metal spatula, transfer cookies to wire rack and cool to room temperature.

Saturday, March 14, 2009

Diner-Style French Toast

Alton Brown and America's Test Kitchen aren't always right. Well, mostly they are, but I vividly recall my father saying as he watched Alton Brown spatchcock a duck, "That's really interesting. I can't imagine ever wanting to actually do that, but it's interesting."

He had a point. Some recipes from ATK or Alton Brown seem, if not unnecessarily complicated, perhaps trying to accomplish something beyond the basic--admirable in some cases, but in the case of french toast, it's not what I'm looking for.

I've been making french toast since I was in the single digits, and it's still what I will order in a restaurant if I'm there for a weekend brunch. I've always been frustrated when I made my version, because it didn't look--or taste--like the french toast I got at a diner. I knew that part of it was the bread--thin slices of wheat bread, while great for sandwiches, were not, I knew, what the diner was making their french toast out of. The wheat bread I had made a very tough, dry french toast--diner french toast was thicker, and stayed moist but not soggy on the inside, while the outside got brown with eggy goodness.

The answer I eventually worked out was Texas Toast, available for about $2.75/loaf at Trader Joe's. Regular white sandwich bread (like the Farmhouse-style from Pepperidge Farm) will do if there is no TJ's nearby. A slice of Texas Toast is about 3/4 of an inch wide, compared to 1/2 of an inch for regular sandwich bread. This helps the toast stay moist on the inside.

I tried both Cook's Illustrated and Alton Brown's recipes for french toast. They were good, but a) they were overly complicated--CI's in particular requires 8 different ingredients, including whole milk, which I don't typically keep on hand--and b) the flavor they made was classic, rich, and French-inspired. I want diner, not petit dejeuner. So here is my adapted version, which borrows a couple ideas but definitely looks more like something a lady named Muriel might hand you on a bleary Sunday morning.

Ingredients
  • 3 slices Texas Toast
  • 1/2 cup of milk (I use 2% because it's what I have)
  • 2 large eggs
  • 1 tbs vanilla extract (optional)
  • 1/2 tbs of butter
Hardware
  • nonstick frying pan/skillet
  • pie plate or other receptacle for egg mixure (microwave safe)
  • whisk or fork for beating eggs

Directions
  1. Beat eggs and milk together. Add butter to mixture in small pieces, and microwave mixture (up to 1 minute) until butter melts. (Keep a close eye on this and stir if necessary so the egg doesn't cook, just warms. Microwaves differ, and I've had some unpleasant surprises.)
  2. Add vanilla to egg mixture, and stir to combine.
  3. Let each piece of bread soak in egg mixture, 30-60 seconds each side, and then set aside to rest on a plate while the skillet heats over a medium flame. (A drop of water put in the skillet should boil quickly, but not skitter all over the surface of the skillet.)
  4. Fry the pieces of toast until brown on both sides, about 3 min per side. (You can choose to put butter in the skillet to truly "fry" the french toast, but with a good, heavy non-stick skillet, I've never actually found that necessary in order to brown.)
  5. Let finished toast slices wait in a 250 degree oven while you finish the remaining slices. The slices can stay in the oven up to 45 minutes, if preparing for a crowd.
  6. Serve with butter and icing sugar, maple syrup, or fresh fruit as desired.